
Secure Boot Violation Fix
I just did Microsoft updates now my computer will not boot into Windows 7!
Secure Boot Violation Fix
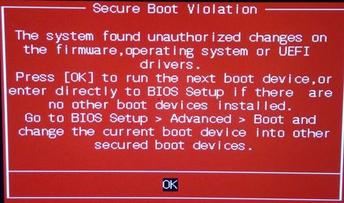 If your Windows 7 computer was working fine, then you perform Windows updates and now your computer is sitting on a black screen, we may have the solution. You may also see a Secure Boot Violation message similar to the one shown here in red or just a black screen with white letters. Microsoft released an update in mid October 2016 that causes this problem interfering with the Windows 7 boot process.
Note this is NOT a computer hardware problem, this is software problem but we offer two solutions to fix this either way.
The Problem
To protect user’s systems from malware attacks, ASUS motherboards implement the Microsoft Secure Boot feature by default. This feature performs a legal loader check to boot into the OS. Since Windows 7 does not support the Secure Boot feature, the system might detect inconsistent OS loader keys, resulting in boot failure.
This happens after installing the update KB3133977 for Windows 7 which occurs during normal Windows updates. Some users may encounter a “Secure Boot Violation” warning when this happens , which makes the system fail to boot into the operating system. If you have automatic Windows updates turned on, you could go to bed with your computer working fine, and wake up to all black screens. We have two solutions, try Fix #1 if that does not work try Fix #2.
The Solution
If you are experiencing this issue with the Secure Boot Violation, you may see a black screen similar to the one shown below. To fix it you will need to enter into the BIOS to change settings following the instructions below. Note that all motherboards are different, this example is for an Asus X99 motherboard.
If your keyboard is not responding
When you try to hit F2 or DEL your keyboard is not responding, try these things:
- Disconnect all peripherals such as printers external hard drives etc.
- If you have one of our multi display QuadStation computers, disconnect all monitors from the back of the video card except monitor #1.
- If you are using a wireless keyboard/mouse then change to a hard wired keyboard temporarily. Make sure to connect into the rear USB ports not front.
If you still have no keyboard response after trying the items above and you have a QuadStation computer you are in luck because you have a second hard drive. That Factory Restore Drive resides in your system but it is disconnected. This is a good thing because it does NOT contain with Windows update above that causes this problem.
That said, by changing over to the FRD drive temporarily, the system would actually boot right into Windows. However, you are not going that far. The goal is just to get into the BIOS to change this setting. Since this drive does not contain the problem causing windows update, your keyboard should now work. Once this fix is successfully applied, you can connect your main drive back again as it was and disconnect the FRD drive. So with the Factory Restore Drive connected, proceed with the following steps:
Fix #1
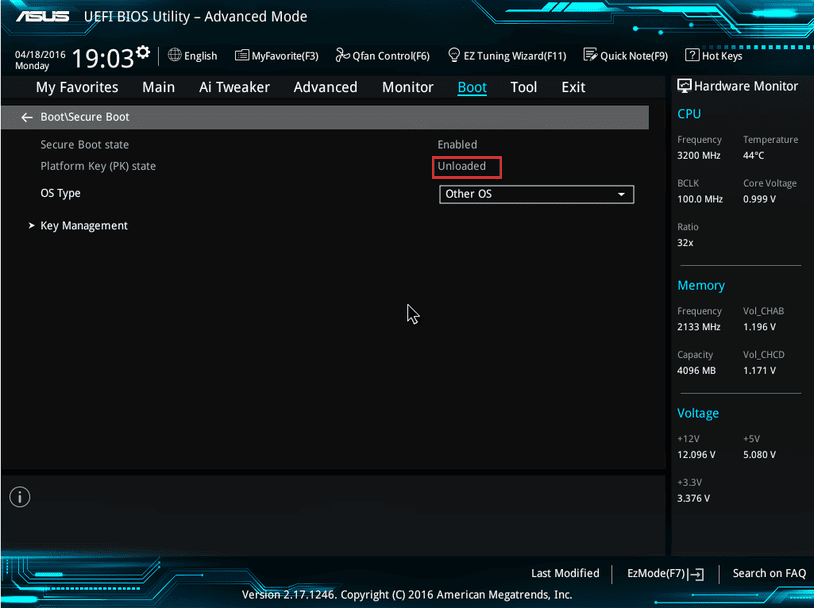
This solution pertains to high end Asus motherboards, but the process will be similar for all motherboards. Here are step by step instructions on how to turn this feature off on an Asus motherboard. Screen shots are shown below if needed.
- Enter the BIOS section by hitting F2 or DEL depending on your motherboard.
- Change to Advanced Mode on the bottom right of your screen.
- Click on the Boot menu at the top.
- Scroll down to Secure Boot and click on it.
- Choose OS Type and change from Windows UEFI mode to Other OS
- Press the F10 key to save changes, exit to reboot the machine.
- Hit F2 or DEL again to go back into the BIOS.
- Repeat steps 1-5 above and double check that Platform Key now says UNloaded.
- Press the F10 key to save changes, exit to reboot the machine normally into Windows.
This should do the trick if not proceed to Fix #2.


Fix #2
- Enter the BIOS section by hitting F2 or DEL depending on your motherboard.
- Change to Advanced Mode on the bottom right of your screen.
- Click on the Boot menu at the top.
- Scroll down to CSM and click on it.
- From the options choose Legacy only.
- Press F10 to save changes, exit and reboot into Windows normally.
About Legacy Mode:
- If legacy boot mode (also known as “CSM boot”) is enabled, UEFI boot mode is automatically disabled or de-prioritized.
- Windows 8 or higher PCs have UEFI support. The BIOS or firmware often has an option that specifies if the computer can boot into regular operating systems and recovery tools, or if it can boot exclusively into newer UEFI operating systems and environments.
- The regular way of booting into software and operating systems is called “Legacy Boot” and must sometimes be explicitly enabled/allowed in the BIOS settings.
- Legacy boot mode does not normally support partitions greater than 2TB in size, and can cause data loss or other problems if you try to use it on your main operating system drive.
If you are using Windows 8 or Windows 10 read this article about malware and Microsoft’s possible loophole.
You should be able to boot to Windows 7 now. If one of these solutions worked for you drop us a line to let us know about it.
Separately, if you use Windows 8 or Windows 10 read this:
Major Flaw Found In Windows’ Secure Boot
(Posted by VIPRE Security News On August 16, 2016 In Featured Article:)
Two anonymous researchers, who identified themselves as “my123” and “Slipstream”, recently exposed a serious design flaw in Windows’ Secure Boot that allows people to open locked devices with a golden key. The researchers claim their published findings prove encryption backdoors can be exploited, and that the golden key demands by governments and investigators endangers the security of all users.
Microsoft primarily built Secure Boot to prevent rootkits, malware that tampers with the boot process. Most systems allow users to turn Secure Boot on and off. Certain systems, including some tablets and phones, do not. Devices that cannot disable Secure Boot cannot install competing operating systems. [Start-970-80]
The researchers found a set-up that allows people to disable Secure Boot’s cryptographic keys — and exploited it to allow any locked device to be unlocked. The pair informed Microsoft of the design flaw, and Microsoft has made some patch attempts to remedy it. However, the patches have not worked, Slipstream claimed.
Responding to the FBI’s suggestion that the “good guys” should get a special software backdoor, the researchers wrote: ”this is a perfect real world example about why your idea of backdooring cryptosystems with a ‘secure golden key’ is very bad! Smarter people than me have been telling this to you for so long, it seems you have your fingers in your ears. You seriously don’t understand still? Microsoft implemented a ‘secure golden key’ system. The golden keys got released from MS own stupidity. Now, what happens if you tell everyone to make a ‘secure golden key’ system? Hopefully you can add 2+2…”.
Microsoft lists the following Windows versions as affected: Windows 8.1 (32-bit and 64-bit), Windows Server 2012 and Windows Server 2012 R2, Windows RT 8.1, Windows 10 and Windows 10 build 1511 (both 32-bit and 64-bit), and Windows Server 2012 and Windows Server 2012 Server Core Installation.\
In your corner – The NTI Tech Team