
What is a Factory Restore Drive?
![]()
![]() Every NTI QuadStation system comes equipped with a very unique second hard drive called a Factory Restore Drive. Think of this extra hard drive like a safety net just in case something goes wrong. Factory Restore Drives are a provided exclusively by NTI.
Every NTI QuadStation system comes equipped with a very unique second hard drive called a Factory Restore Drive. Think of this extra hard drive like a safety net just in case something goes wrong. Factory Restore Drives are a provided exclusively by NTI.
What is it Used For?
The FRD drive is completely bootable and it will restore your system quickly. In the event of a hard drive or software issue, this will help. So all you have to do is change 2 cables from one drive to another. This will restore your system back to factory state in minutes, no skill required.
Making the Restore Drive
After all quality control inspections have fully passed in production and just before shipping, we shut the system down. The System drive is removed and we make a ‘bootable clone‘ of this drive. Once the clone is complete we put this drive back in the system and boot to it to test it.
Then the Restore drive is labeled and mounted back inside the system. The FRD remains disconnected for a good reason, to keep it pristine. This way, if you get a virus for example on the main drive, your FRD drive remains unaffected. That said, you will not see this drive shown in Windows. If you open the computer case you will see it inside the QuadStation.
Why Include a Second Hard Drive?
Because it will restore your system back to factory state in 5 minutes.
Because Sometimes Things Go Wrong
As with any computer system, when something goes wrong, 99% of the time it is software related (an application, the Windows OS, a virus etc), not the hard drive. When that happens it is much faster to switch over to the FRD drive rather than spending hours troubleshooting software issues. Although very rare it is possible that a hard drive can fail, but the FRD drive has you covered there as well.
Maximum Uptime
NTI understands that computer downtime is not an option. With an FRD drive you are back up and running with your system as it came from the factory in less than 10 minutes.
No need to reload the operating system, component drivers etc. We have already done that for you saving you hours of time. Just reinstall your personal software and you are back to work.
What About my Data?
Once your system is back up in Windows, you can copy your data back over from your personal backup system in several ways. Choose the one that is best for you, and depends whether your original SYSTEM drive is accessible.
- The easiest method would be to purchase a USB external hard drive enclosure available at Best Buy or similar stores. You then put your SYSTEM drive inside this casing, and plug it in via USB to access and copy over all of your data back to the computer
- Is you use an offsite data backup service such as Carbonite, DropBox etc, you can simply restore your data back to the computer this way .
Is This the Fastest Way to Restore My System?
Absolutely. Using the NTI Restore drive, your system will be back up and running in 5 minutes. Compare that to spending several hours it would take you to reload Windows, drivers, software and everything from scratch.
How to Change over to the Factory Restore Drive
There are 2 different procedures depending on which type of Solid State drive that your system came with.
If you have a standard 2.5” Solid State Drive, all you have to do is open the left side of the computer case, unplug 2 cables from the System drive and plug them into Restore drive (FRD), that’s it. See procedure #1-A and B below.
If your system came with nVME Solid State M.2 sticks, you will replace the System M.2 with the Restore M.2 provided. This is a little more technical but you can do it.
Detailed instructions are shown below for both procedures. Remember, you will need to reinstall your programs and personal data again but that would not take long. If you would like to call us before you proceed please feel free to do so.
(NOTE Your RESTORE drive location may vary depending on the mounting bracket and case that we used, see below.)
Procedure #1 for 2.5″ Solid State Drives:
- Shut down the computer and remove at least the power cable from the back of the unit.
- Next, remove the left side cover of your computer case after removing the 2 screws on the back edge of the left side cover. The thumb screws (no tools needed), one is high one is low.
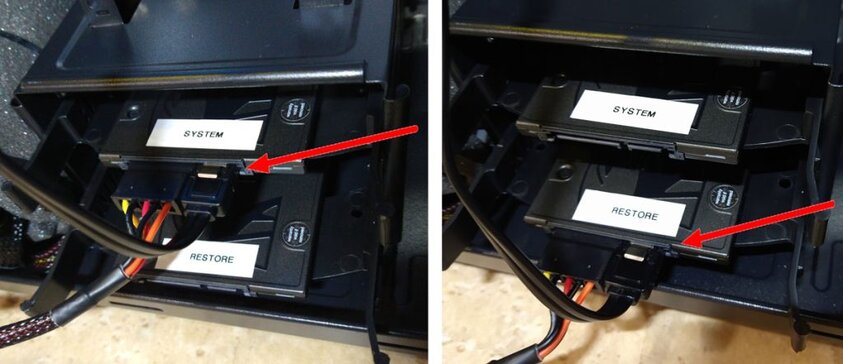
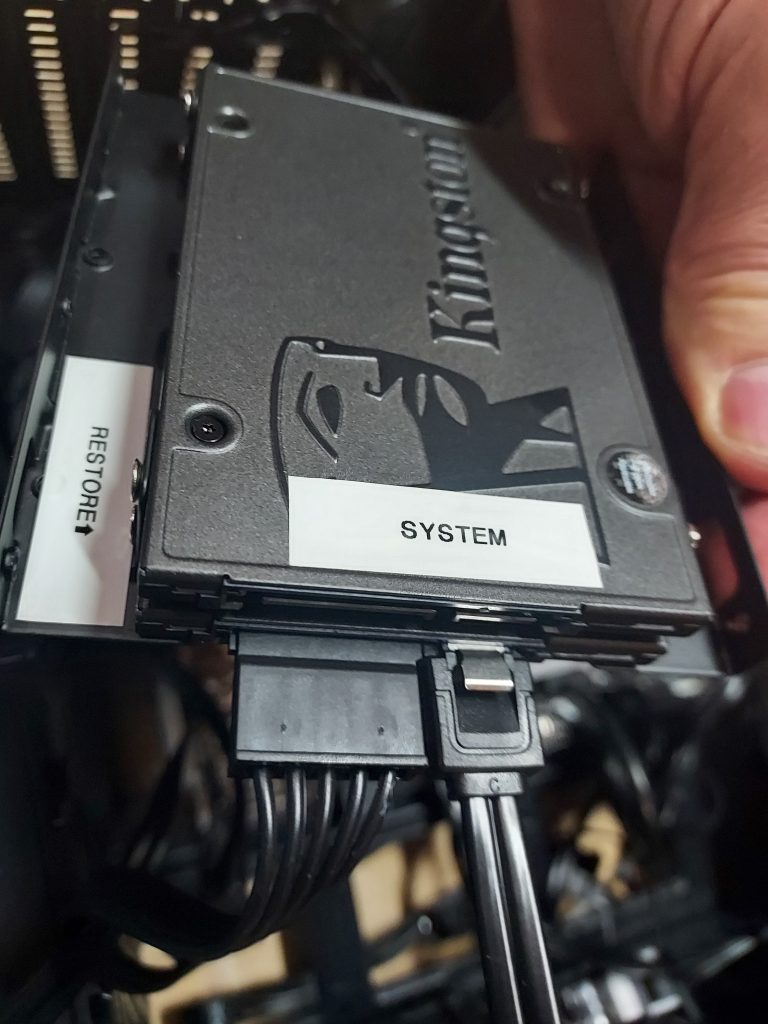
- Locate the 2 hard drives mounted in your system. They are clearly labeled SYSTEM and RESTORE. Note the pics above: Whether your main System drive is a Solid State drive or a full size hard drive the process is the same.
- Then switch the two cables from the System drive over to the RESTORE / FRD Drive (see pic). Depending on the style of your case, the 2 cables shown in the picture should be easily accessible. For older systems the cables may be behind the drives requiring you to slide both of drives out of the hard drive trays. It is easy don’t worry. If this is the case you most likely will need to cut the zip ties on the sides, holding in the hard drive trays. We do this for the security during shipping.
- Now restart your computer. The system should boot right back into Windows just as you bought it from us originally. Remember none of your data or programs that you have added after you bought the system will be there This procedure restores the system back to full factory state just as it came from us originally. Your data will still be on the SYSTEM drive that you disconnected. Read more below.
- If Microsoft prompts to RE-activate your Windows Operating System, no big deal. Your product ID number is on a sticker on the side of your computer case.
- Finally, install your personal software, and you are back up and running
Procedure #2 for M.2 nVME Solid State Drive Sticks: (picture may vary)

- Remove the small cover. The M.2 System drive is under the M.2 Cover
- Turn the Locking Tab to unlock and remove the System M.2 SSD stick
- Replace it with the Restore M.2 SSD stick , turn Locking Tab to lock it in place.
- Replace the M.2 Cover
- Start your computer, it should boot right into Windows just as you first got it from us originally.
- If prompted, follow the Microsoft prompts to RE-activate Windows by entering in your Microsoft Product ID located on the sticker on the side of your case.
The Restore Drive is NOT a Backup for Data
Remember, the Factory Restore Drive is NOT a backup for your data.
This special drive is inside your case but not connected. A RESTORE drive is used to restore a QuadStation system back to factory state. It will boot right up with Windows loaded just like you got it on day one.
Please implement your own backup routine for backup up your data on a regular basis. If you need help backing up, see this page.
- You CANNOT have both the System and the Restore drive connected at the same time. They both have Windows loaded on it and it will confuse the computer which one to boot to. Only ONE drive can be connected at a time.
- Remember you cannot COPY back over any Program just by dragging or copying the folder. Programs must be reinstalled. Only data files can be copied, you cannot copy a program.
- If for any reason you need to remove the hard drive from the case, this is easy. The hard drives are mounted in removable metal trays making them easy to remove. Simply slide the tray out of the case by squeezing in the tabs on the left and right, this will release the tray.
- During shipping these drives may have been zip tied on the sides. You can cut these zip ties before removing the trays if needed.
What About My Main Drive?
Now that you are back up and running on the Restore drive, what do you do with the main System drive? You have a few options here depending on the status of the drive.
Viruses, Software Issues or Windows Corruptions
If you had to switch to the Restore drive because of a virus, or Windows corruption, you can wipe the drive and reload a fresh copy of Windows on the Main drive (see below). You have everything you need to do that, the Windows install CD and all hardware drivers came with your system.
Do this over a weekend or on a non-work day so you have plenty of time. You would just disconnect from the RESTORE drive as shown above, and connect the SYSTEM drive again.
If the Drive Does NOT Work
If the Main hard drive is non responsive, for example it will not boot into Windows, it may need to be replaced. Contact us we will tell you what to do from here.
If the drive DOES Work
If the drive is ok and accessible in Windows, you have a couple ways to go here make the right decision for you:
OPTION 1– You can reinstall Windows and drivers from scratch, overwriting that drive. Note this will not include any of your data or programs, they will need to be added back to the drive after windows is installed.
OPTION 2– If you have the technical ability and cloning software such as Acronis, you can make a CLONE of the main drive.
The great thing about this option is that you it will also include all your personal software and data if applicable, to the RESTORE drive. This way if you ever needed to use it again, it will bring your system back with Windows, all drivers and INCLUDING all of your personal software etc. If you have questions about this drop us an email we are happy to explain this.
Re-installing Windows Back on the SSD Drive
If your drive IS intact and you just need to reload Windows, change the 2 cables from the Restore Drive to the SSD drive as shown above. To begin Reloading a clean copy of Windows on the SSD drive, have the Windows operating system CD (that came with your system) ready and boot the system.
As soon as you power it on, put the CD in the drive. The system will begin to load Windows automatically on the SSD drive. If you miss it, just reboot the system and try again.
If you have questions just give us a call, we will be happy to guide you.
Re-Installing the Hardware Drivers
Once Windows is fully reloaded on the SSD drive, you will need to install the Motherboard Drivers first. That CD is in your accessories box. Video Card Drivers must be downloaded from the manufacturer’s website, AMD, nVidia depending on the video card(s) in your system. Contact us for the exact model of the video card if needed, or see your NTI Invoice that we gave you.
Cloning the Main Drive Back to the Restore Drive Using a Cloning Machine
First, you will need a way to CLONE the drive. The easiest method is to use a Cloning Machine (search on Amazon) such as the one shown below. This is a device that clones a hard drive standalone from drive A to drive B, very simple. This will have all of your preloaded personal software, operating system and data already on the RESTORE drive if needed. You can Clone your hard drive on a regular basis so you have an updated and fully BOOTABLE clone of your main hard drive!

A cloning machine like the one above will clone SSD or SATA hard drives, both 3.5″ or 2.5″ hard drives. Note it will require that you open the computer and remove the SOURCE drive to be Cloned. It is not that hard, if you need assistance give us a ring.
Cloning a Hard Drive Using Cloning Software
Cloning your hard drive can also be done using Cloning Software such as Acronis True Image (google this). This method is quite a bit more technical but it does not require that you remove your hard drive form the computer. The entire process is done through the software interface of the cloning software.
However, heed this warning! If you select the wrong SOURCE drive during this process, you could erase your main hard drive! If you are uncomfortable with this STOP HERE. Either have an IT person clone the drive for you, or use the Cloning Machine method above, it is much easier.
NOTE: If you buy QuadStation Systems from us regularly (traders, control rooms, surveillance etc) and have proprietary software that you load on them, this is a perfect solution. As soon as you get a new QuadStation from us, load all of your personal and business software as you normally would. Then CLONE the main drive over top of the RESTORE drive (included with all QuadStation systems) using one of the methods above.
Once complete, simply disconnect the RESTORE drive and leave it unplugged, then plug the SYSTEM drive back in to resume. If you every need to recover the system, you will be very happy you did this.
Also See Backup Up and Creating Images
What is the Difference in RAID and a Factory Restore Drive?
Since 99% of computer system failures are software related, a RAID array would not help you in the event of any software corruption (a virus for example) it would just COPY the problem (and the virus) to the second RAID drive.
A Restore drive protects against a hard drive OR software failure, so you are covered no matter what happens.
RAID on the other hand ONLY protects against a hard drive failure.
NTI Restore Drives are a very valuable feature that we offer at no charge. It will restore your system quickly preventing system down time.
If you have questions, just give us a call. Our phone numbers are on the top of every page of our site or drop us an email. Our very knowledgeable US based team will be happy to speak with you any time.
Order Your New QuadStation Today!
