
How to Backup My Computer
 We can’t stress this enough. The frequency of your backups should be directly proportionate to the value of your data. If it is priceless, back up daily. A general rule of thumb is to back up at least once a week for general data, word processing documents, pictures etc.
Accounting data, we recommend backing up daily. Quicken and QuickBooks for example have a backup utility built right in so no excuses! If you don’t know how to backup, learn. Everything you need to know is right here on this page. Print it out now for your reference or at the very least bookmark this page.
How Often Should You Backup
How important is your data that is the question you need to ask yourself. If it is very important then backup more frequently, if it is not important to you then backup less often. When was the last time you backed up? You should ask yourself that question at least once a week.
Don’t Lose Your Data!
Loss of data is something that is ignored until it happens to you, then it is a critical emergency. People who do not back up until it is too late often losing years worth of work! If your computer crashed right now, how difficult would it be to replace all the information that you have stored in it? Think about it for a minute.
Don’t wait until it is too late. Get on a stringent backup regimen and stick to it. You will be glad you did when something goes wrong.
Who is Responsible for Your Data?
You are. Although you may have a computer technician help you set up the hardware and maybe even help configure your backup software, it is your sole responsibility to make sure that it works every day, not the technician.
Verify Your Backup
You must verify that your backup is working as well, so do not take it for granted. If you lose data it is because you are not verifying your own backups, not because a technician did something wrong. They cannot be there every day to make sure your backup is working it is up to you.
Automate the Task
Automating the task of backing up takes the worry out of it. For example you can schedule your computer to do a backup every Friday night at 11:00pm. The best part is you don’t have to be there. It will launch automatically as long as your computer is on. See below for how to set this up.
Which Backup Program to Use
Windows 7 /10 /11 comes with a built-in backup utility that works very well. It is easy to understand and utilizes a very simple interface so it is easy to do. Wizards walk you through the process and restoring is simple. Full details below.
Schedule It
A built in scheduler allows you to automate the task if you wish even across a network. To do this you must assign a password (if you don’t already have one) to the “Backup User”. The user you are currently signed in under (see the people icon on your start menu).
What to Backup
There are two basic approaches to backing up. One is that you backup your entire computer which includes Windows, data and programs. You can create a System Image or Clone the hard drive, see details on those methods below.
The second method is backing up just your DATA files (Word documents, spreadsheets, financial data, favorites etc). This is the method is much faster, easier and more practical if you ever need to quickly recover your data. You can choose exactly which files and folders to backup when setting up your backup software.
Drag and Drop Method
This is the process of simply dragging a copy of your data over to an external storage device such as an external hard drive, or USB thumb drive. You can also ask your computer guy to install an extra backup drive INSIDE your computer. It would show up as an additional drive letter in your This PC or My Computer area. This process is the same regardless of what you are storing to. Read more below.
Offsite Backup / Cloud Services
Services such as Carbonite, DropBox, iCloud and others can automate the backup process for you. You pay a flat annual fee for cloud data storage and it is truly a set it and forget it setup. It works very well and if you need to retrieve your data at any point, just login to your Carbonite account and it walks you through the restore process.
However, keep this in mind! Research the cloud service you are using to see how often they purge their content, often it is every 30 days they are all different. So for example, if you delete something on your computer, 30 days later it could also be GONE in the cloud as well. Make sure you understand how it works.
Backup Media
There are several media types to choose from depending on how big your data files are. Common media types are DVD, USB pen drives, NAS devices and external hard drives.
The size of your data will determine which media type makes most sense for you. To give you an idea, a DVD holds about 4.7Gb of data, a USB comes in many sizes ranging from 2Gb to 64Gb+. An external hard drive is much higher since these are full size hard drives mounted into an enclosure. Hard drives come in sizes from 500Gb up to 4000Gb+.
External USB Hard Drives
External hard drive enclosures come in 2 sizes, 2.5″ (laptop sized hard drive, very portable) or 3.5″ (desktop sized hard drive). The best part is that most of them are connected through USB which makes it easier to backup multiple machines if needed. This is the most practical method.
Cloning Your Hard Drive as a Backup
See our Cloning hard drive page for full details on Cloning your hard drive with a Cloning Machine or Cloning Software.
Creating a System IMAGE file as a Backup
You can use the built in Backup / Restore utility in Windows to create what is called a SYSTEM IMAGE file. This is very different than Cloning mentioned above or backing up your data.
When you create an Image file as a backup, you are creating a special, single compressed file that includes all of your data, programs and operating system (make sure you check this box during this process). If you need to use it, this 2 step process will RESTORE your system by overwriting your drive, with this Image file. This process will take a while (sometimes hours) to both create the Image file and to restore it so keep that in mind.
NOTES ABOUT IMAGE FILES:
- If you check the box to include the operating system, it will be bootable. If you do NOT, the drive will NOT be bootable so keep that in mind.
- You CANNOT restore individual files from a system image file like you can a simple backup set above. The only choice is to completely restore your entire system which will take hours to do.
- A System Image file is massive in size so make sure your destination drive is very large. you really should use a 2nd physical drive for this as opposed to saving the image file to your main C drive.
- If you are NOT technical you should not use this method as restoring to it is a bit involved.
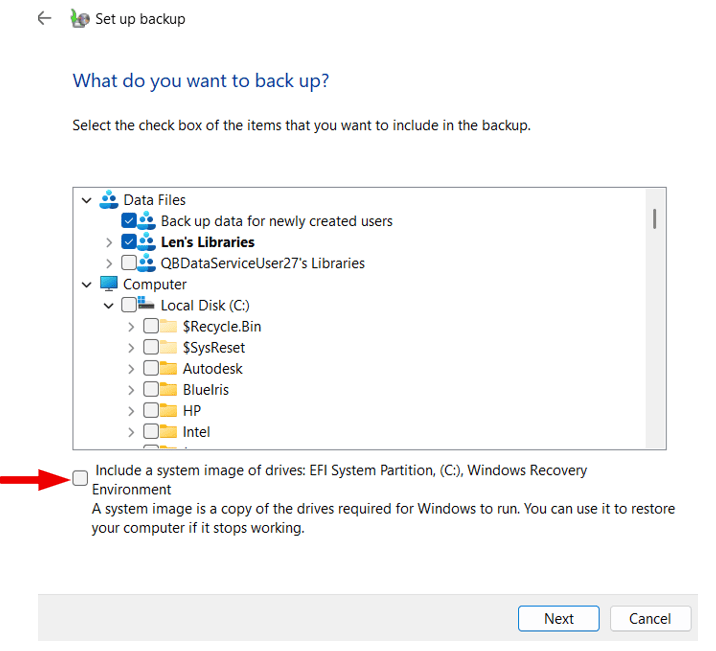
If you still wish to include a system image file, check this box when setting up your backup:
If you need a faster solution see Cloning Your Hard Drive method.
Reminders
Set a reminder to backup in your Outlook, or other scheduler so you don’t forget to backup.
Verify Your Backup
Verifying your backup is as important as the act of backing up itself. Too often businesses go for years assuming that their backup is good, until it is late. The computer crashes and they go to restore from their backup only to discover that is has not been backing up like they thought, sometimes for months or years!. Case and point.
It is easy to do
Simply open up Computer icon, navigate to the location of your backup set, and just look at the date and file size of your last backup. Get in the habit of doing this regularly to avoid disaster.
Know Where Your Data is Stored
Which leads me to my next point, know where your important data is at all times! At any given time you should be able to go right to the folder that stores ALL of your data on your hard drive or network. If navigating is difficult for you, take the time to learn how.
Outlook Users: Know Where Your PST / OST is Located
Microsoft Outlook is one the most versatile and widely used programs for businesses. All data is centralized in one convenient location including, email, contact, schedules, to do lists, memos and more. It has become a lifeline for businesses however most people have no idea where their database file called, “outlook.pst” is located. If you lose this file you have lost everything in Outlook…everything.
Note that if you use Office 365 this is like having Outlook in the cloud, with a local file on your computer called Outlook.OST. This file synchronizes your outlook in the cloud, to a local file on your computer. This is in case you lose your internet connection, you will still a local copy of your outlook data.
Know where your PST / OST Data File is Located
Whether you are using a LOCAL version of Outlook where you installed it from an Office CD or Office 365, you should know where your data file is located.
Make sure to include this file in your regular backups! Find out where your PST/OST file is located and know it at all times. In Windows 7/10/11 for example it is located in: C:\Users%YOURusername%\AppData\Local\Microsoft\Outlook. You can also search for your PST file do a search on your computer for “*.PST” or “*.OST”. Record this location in your Outlook as a Memo for future reference.
Ask Yourself This: Could you find this file quickly in the event of a hard drive emergency?
If you Move your PST
Some people prefer that the file be located in a more convenient location such as MyDocuments. If you have a good understanding of navigation and file structure within Windows go for it. Just remember that the next time you open Outlook, it will be looking in the old location. You will have to tell it where the new location of your PST/OST file is located.
Browser Favorites/Bookmarks
Your favorites / bookmarks must be backed up separately from your documents so don’t assume your favorites will be saved automatically. In Windows, Favorites are stored in a folder located at: C:\Documents and Settings\<username>\Favorites.
It will be in the same directory as MyDocuments and will have a little gold star as the icon. Backing up your Favorites is done a little differently for different browser but easy to do. See the Browser manager on your browser menu.
Backing Up Using the Windows 11/10/7 Backup Utility
- Open Control Panel and click on Backup and Restore . It is under System and Security or in Category view it just be Backup and Restore.
- Do one of the following:
- If you have never used Windows Backup before, click Set up backup, and then follow the steps in the wizard. Administrator permission required If you’re prompted for an administrator password or confirmation, type the password or provide confirmation.
- If you have created a backup before, you can wait for your regularly scheduled backup to occur, or you can manually create a new backup by clicking Back up now.
- Next, choose where you would like to save your backup. (You should not backup to the same drive that your data is stored on. See Backup Media section above for backup locations).
- On the next screen, select Let Me Choose and select all of the locations where your data is stored. It will save this a backup set. (If you want to include a System Image stop here and read that section above once more to make SURE that is what you want to do.
- Choose how often do you want to backup and at what time.
- Save Settings
- Click on the Backup Now button on the upper right to start your first full backup. (Note: If this is your first time backing up this will take a while so be patient. After the initial full backup set is created it will go much faster, backing up only the data that has changed since your last backup).
NOTE if you are still using Windows XP. Stop here and consider a new computer today.
Important Notes
About Formatting
You can use Backup to back up and restore data on either FAT16, FAT32, or NTFS volumes. If you have backed up data from an NTFS volume , it is recommended that you restore the data to an NTFS volume used in Windows XP , or you could lose data as well as some file and folder features.
Some file systems might not support all features of other file systems. For example, permissions, encrypting file system (EFS) settings, disk quota information, mounted drive information, and Remote Storage information will be lost if you back up data from an NTFS volume used in Windows XP and then restore it to a FAT volume or an NTFS volume used in Windows NT 4.0.
SQL Data
To back up and restore Microsoft SQL Server database files, it is recommended that you use SQL’s built-in backup and restore utilities. For more information, see the Microsoft SQL Server documentation.
Tape Backups
Some tape drives might not support hardware compression
Are You an Admin
You must be an administrator or a Backup Operator to back up files and folders. For more information about permissions or user rights. In addition you must have a password assigned to this user if you want to schedule the backup. It will not start without it.
- To start Backup, click Start, point to All Programs, point to Accessories, point to System Tools, and then click Backup.
- If the Backup and Recovery Wizard does not start by default, you can still use it to back up files by clicking the Tools menu, and then clicking Backup Wizard.
Local Computer Only
You can only back up the System State data on a local computer. You cannot back up the System State data on a remote computer.
